

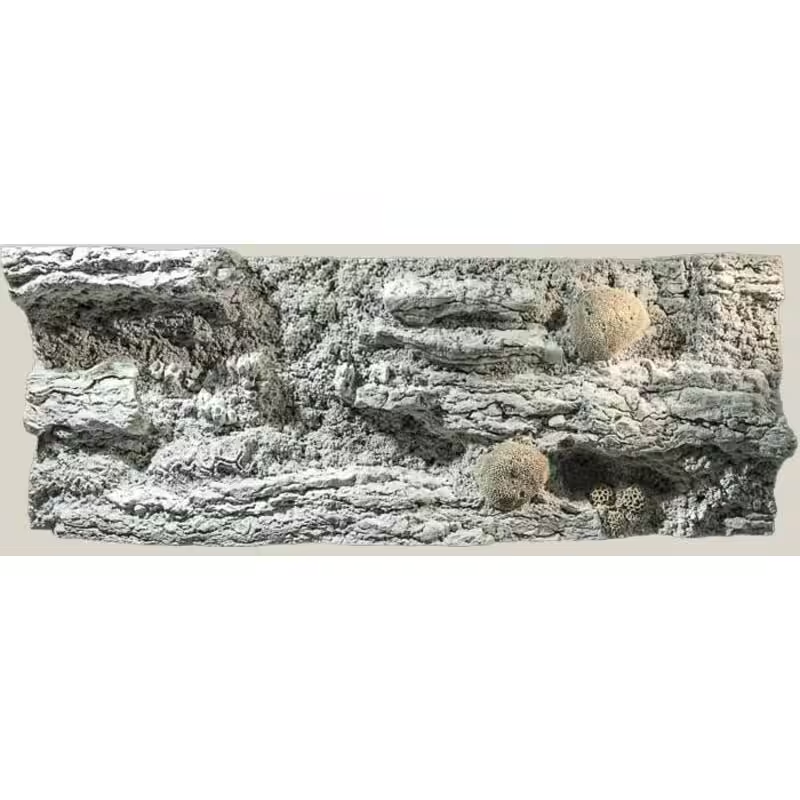

Reef Background 100 X 50 Cm
All Shipments insured against damage and loss.

This Back To Nature Reef Background creates a natural-looking marine aquarium backdrop with overhangs and terraces, hiding equipment from view.
Description
With the Reef background it is now possible for the first time to create a natural-looking background with overhangs and terraces even in a marine aquarium. Distracting impellers, shafts and cables can be easily concealed behind it. Combined with a couple of pieces of live rock you can quickly create a biologically active aquarium background. The Reef background will be quickly colonised by corals, tubeworms, sponges and coralline algae and is resistant to algae eaters such as doctor fish, snails and crustaceans. It can therefore be used both for reef tanks and fish-only tanks. As fish-only tanks are notoriously difficult to design without corals, with the Reef back-to-nature background attractive solutions have now become a possibility.
This listing is the smallest panel in the range: article 03000121, the Reef 100 x 50 cm, which measures 1000 x 500 x 190 mm and is made for aquariums of 1000 x 500-550 mm (length x height). Back to Nature build the Reef background in six sizes from this one up to 2000 x 600 mm, and much larger aquariums can be fitted by joining several backgrounds together.
Setup & Use
Read the whole thing before you cut anything. That is
Back to Nature’s own first instruction, and it is a good one: several of the
steps below have to be decided before the saw comes out. Installing a 3D
background is not difficult, but it is manual work and it is
irreversible. A panel cut short cannot be uncut. Back to Nature note
that if you would rather not do it yourself, aquarium builders will fit one
for you when the tank is made.
Nineteen centimetres. Plan for that first. This panel is
1000 × 500 mm on the face and 190 mm front to
back. That depth comes out of the swimming space of the aquarium, so
on a tank 450 mm deep you are left with about 260 mm in front of the
rockwork. It is also the space you get back: pumps, return pipes, probes,
heaters and cables all live behind it, which is the reason to fit one in a
marine tank at all.
Which way up? Your choice. Back to Nature state that
their rock backgrounds have no upside down and no right or wrong way
round. Only the Amazonas backgrounds are fixed, by the wood root
moulded into them. Stand the panel up both ways and pick the one you like.
Cutting to fit. Stand the background behind the aquarium
with its edge in line with the inside of the glass. It is the
internal dimensions that matter, so allow for the thickness of the glass.
Use the tank itself as the straight edge, draw a vertical line with a felt
pen and cut with a saw. Then try it in the tank. If it is a shade tight,
carve it back with a knife, or use a plane or a coarse file. Where a centre
brace or a reinforcement strap is in the way, measure where it lands on the
panel and cut around it. Back to Nature point out that a horizontal
glass brace then helps hold the background in place rather than fighting
it.
Wedging and gluing. Clean the glass first. Hold the panel
in position with a couple of sticks jammed between it and the front
glass (the offcuts you have just sawn away work well) because
it must not move during the next step. Then run aquarium silicone along the
bottom and the sides, against the glass. Back to Nature’s own tip for the
awkward corners: warm the nozzle of the cartridge and bend it into an L, and
it will reach. They say “aquarium silicone” and name no particular brand or
grade, so neither do we.
If the tank is taller than the panel. Make up the
difference (up to 10 cm) with filter foam or foam board.
Back to Nature’s instruction for every one of their 3D backgrounds is that
the middle of the panel should be glued down onto a glass strip or a hard
foam plate at the base, with the free space underneath filled with filter
foam, glued to both the glass bottom and the back wall, and the overlap cut
away along the panel. Cover that foam with silicone and scatter coarse sand
or gravel over it.
Hiding the seams. While the silicone is still fresh,
scatter sand, peat or colour pigment over the seam as thickly as you can,
then press it gently in to help it stick. Wear disposable gloves. Once it is
covered, leave the silicone to cure for 12 to 24 hours
before the aquarium is filled.
Inlet grilles: decide the positions before you
glue. Depending on the size of the background, two or more inlet
grilles are set into it: one at water level, and at least one drawing
from open water. Put them on inconspicuous surfaces, sideways on or
under an overhanging stone. The hole is cut with a 60 mm rotary
drill, which is the size of Back to Nature’s own inlet strainers.
The strainers are a separate product. See What’s in the Box below.
The space behind it is a filter. Back to Nature’s point,
and the reason experienced keepers use these panels: you can build a
biological filter in the void behind the background. They say such filters
are more powerful than conventional ones simply because of their volume,
usually cheaper, and can run for up to ten years without cleaning.
In a marine tank. This is the Reef panel, and Back to
Nature build it for reef and fish-only systems both. Corals, tubeworms,
sponges and coralline algae colonise it quickly, and it stands up to the
animals that graze it: tangs, snails and crustaceans. Once it is
covered in coralline it stops looking like a moulded panel at all, which is
the point of buying one.
What Back to Nature do not publish, and we will not
guess. Any soaking, curing or leaching period for the panel itself
before livestock goes in. The only waiting time they give is the 12 to 24
hours for the silicone. If you are fitting this to a running system rather
than a new one, take your own precautions.
Every step above is Back to Nature’s own, from their installation
guide and their product literature.
What’s in the Box
One panel. That is the whole of it. Back to Nature’s Reef
background is a single moulded piece, hand-made in Sweden, supplied as
article 03000121, the Reef 100 × 50 cm,
measuring 1000 × 500 × 190 mm. It is not a kit and it does
not arrive in sections. (Their modular marine range, ReefLine, is a different
product line with overlapping edges designed to be joined; this is the
classic one-piece Reef panel.)
Not in the box, and sold by Back to Nature as separate
products:
- Inlet strainers, 60 mm, in white or black: the grilles that go into the holes you cut. Their own catalogue lists them
individually, so budget for two or more. - Power Glue, 290 ml, clear or black: Back to Nature’s own adhesive for installing backgrounds and modules.
- Pump covering rocks, small and large: the matching pieces for hiding equipment that will not fit behind the
panel.
Not in the box, and not sold by anybody as part of it:
aquarium silicone; a saw, knife, plane or coarse file for trimming; a
60 mm rotary drill or hole saw for the grille openings; filter foam or
foam board for making up a height difference; sand, gravel, peat or pigment
for covering the seams; and disposable gloves. None of that is a criticism of
the product. A background is a moulded panel, and the fitting materials
are the installer’s. It is simply worth having them on the bench before the
panel arrives rather than after.
One thing Back to Nature do not state. Whether a printed
instruction sheet ships in the carton. Their installation guide lives on
their own website, and their literature does not say what paper travels with
the panel. Assume it does not, and read the instructions before you start.
Contents and accessory list from Back to Nature’s own product page,
marine brochure and accessories catalogue.
Returns & Replacement
Returns are accepted within 7 days of delivery, provided the item is unused and in its original packaging. Manufacturer-sealed items cannot be returned once the seal is broken, and sale-priced items are not refundable.
If your item arrives defective or damaged, message us on WhatsApp with your order number, or email us if you would rather, and we will replace it. Approved replacements are delivered within 3 to 5 business days. Transit damage is covered by insurance on every shipment. If tracking shows delivered but nothing reached you, tell us within 48 hours, which is the reporting window Indian couriers allow. Damage caused during installation or use is not covered; replacement spares for such cases are chargeable.
Full terms are on our Cancellation & Returns page.
Reviews
Sorry, no reviews match your current selections
Q & A
Ask a question