Most planted-tank CO2 setups end up assembled from three or four different brands, because no single manufacturer makes every stage of the system. ISTA is the exception at IndieFur: the brand covers diffusers, controllers, cylinders, reactors, and even the scissors and glue used to plant a scape, which makes it possible to build a complete CO2 system without mixing and matching. This guide walks through the range stage by stage, from injecting CO2 into the water to shaping the scape around it. If you’re still deciding what kind of layout to build before wiring up CO2, our Aquascaping Styles Guide is a good starting point.
Do you need pressurised CO2?
Not every planted tank does. These are the three options, from least effort to most.
| Level | What it is | When it fits |
|---|---|---|
| CO2 tablets | ISTA CO2 Tablet dissolves gradually and releases CO2 | A small planted tank with no pressurised system. ISTA says it is not a substitute for injected CO2 on a high-light tank. |
| Liquid carbon | API CO2 Booster adds carbon plants can absorb from the water, dosed once a day. API says it does not alter pH and can be used alone or with CO2 systems. | A low-tech tank where you want a simple daily dose |
| Pressurised injection | Cylinder, controller, bubble counter, check valve and a diffuser or reactor, covered below | Medium and high-light planted tanks, and carpeting plants |
The rest of this guide covers the third level. If you are still deciding on lighting, see our aquarium lighting guide first.
Step One: Getting CO2 Into the Water (Diffusers)
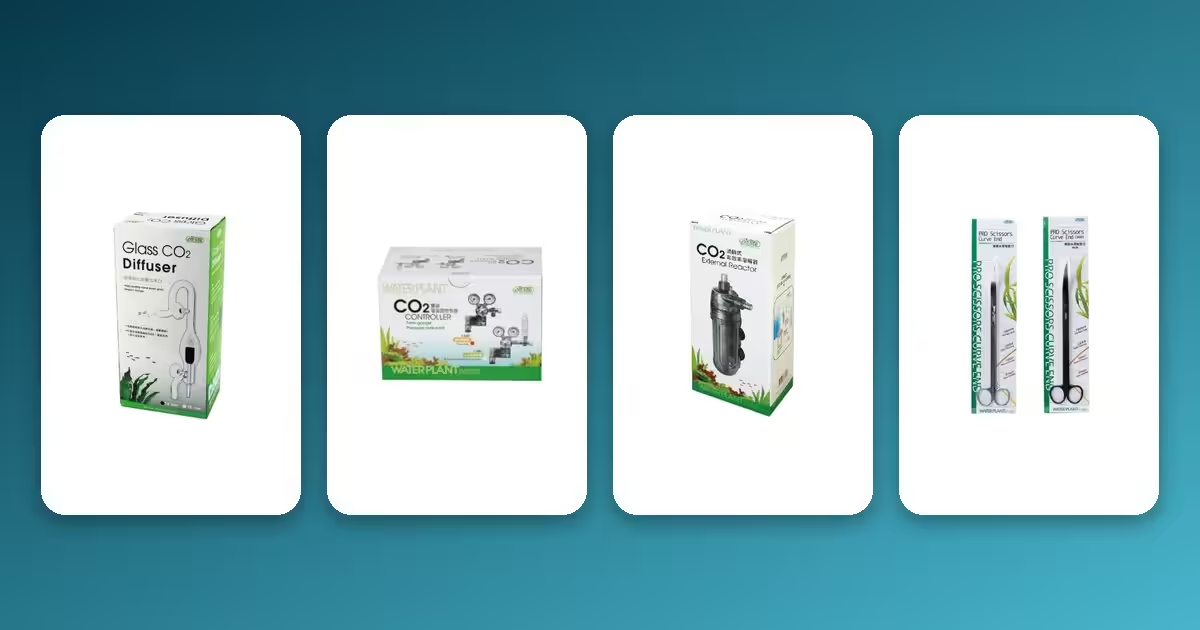
The diffuser is where dissolved CO2 actually enters the tank, and ISTA covers more diffuser styles than most brands bother with. The ISTA Glass CO2 Diffuser (12mm, or the larger 16mm version) uses a ceramic disc to break CO2 into a fine mist and is the classic choice for aquascapers who want the diffuser itself to disappear visually in the layout. For a more compact footprint, the ISTA Mini CO2 Diffuser suits nano and small planted tanks where a full-size glass diffuser would dominate the scape.
If you’d rather not deal with a separate bubble counter and check valve, the ISTA 3-in-1 CO2 Diffuser (available in S, M, and L) combines diffuser, bubble counter, and check valve in one unit, and the ISTA 2-in-1 CO2 Diffuser (also in L) pairs the diffuser with a built-in bubble counter. The ISTA UFO CO2 Diffuser (S or L) uses a wide, flat shape that maximizes contact time between CO2 and water, which suits taller tanks where bubbles would otherwise reach the surface before fully dissolving.
Which diffuser fits your setup
ISTA does not publish a tank-size rating for any of these diffusers. The S, M and L on the names describe the size of the unit and not the size of the tank, so choose by how it mounts and what else you need to buy.
| Diffuser | Where it sits | What else you need |
|---|---|---|
| Glass CO2 Diffuser 12 mm or 16 mm | Inline on the canister filter outlet hose | Measure your outlet hose first, because 12 mm and 16 mm are not interchangeable. Fit a regulator, bubble counter and check valve upstream. |
| Mini CO2 Diffuser | In the tank on a suction cup | A bubble counter and a check valve, sold separately |
| 2-in-1 Diffuser M or L | In the tank | It includes a bubble counter. ISTA’s setup instructions put a check valve on the CO2 pipe. |
| 3-in-1 Diffuser S, M or L | In the tank | Nothing between the controller and the diffuser. It combines bubble counter, spring check valve and ceramic plate. |
| UFO Diffuser S or L | On the tank floor, with a vertical inlet so the tubing does not kink | A check valve upstream |
| CO2 Diffuser Chamber | Upright in the tank, and chambers can be joined for a larger tank | Suits low-pressure sources such as disposable canisters and cartridge sets |
The ceramic plate in the 3-in-1, 2-in-1 and UFO diffusers is replaceable, so the body is a long-term purchase.
Step Two: Reading and Controlling Flow (Bubble Counters and Check Valves)
Whichever diffuser you choose, you need a way to count bubbles per second and prevent water siphoning back into your regulator. The ISTA 2-in-1 CO2 Bubble Counter + Check Valve and the metal ISTA 2-in-1 Metal Bubble Counter and Check Valve both combine the two functions into a single inline fitting, which is simpler to plumb than sourcing them separately. The ISTA CO2 Diffuser Chamber gives CO2 extra dwell time in a small internal chamber before it reaches the main diffuser, useful if you’re seeing bubbles escape to the surface undissolved.
Step Three: Regulating Pressure (Controllers and Regulators)
Between the CO2 cylinder and the tubing, a pressure controller steps the cylinder’s high pressure down to something the diffuser can work with safely. ISTA’s Single Gauge Pressure Reduced CO2 Controller ships in blue, red, green, and gold finishes, giving a single working-pressure reading. The ISTA Twin Gauge CO2 Controller (Face-Side, or the Face-Up cylinder version) adds a second gauge showing remaining cylinder pressure, so you can see a nearly-empty cylinder coming before the flow rate drops off mid-photoperiod. For hobbyists who want the dual-gauge readout on a face-side cylinder specifically, the ISTA Dual Gauge CO2 Controller and ISTA CO2 Controller (Face-Side) cover that configuration directly.
On the cylinder side, ISTA’s Vertical Pressure Reduced Regulator (Face-Up mount, in green, blue, red, and gold) fits cylinders that stand with the valve facing upward, while the dual gauge controller is built for face-side valves, the single gauge controller is built for face-up cylinders, and the twin gauge comes in both a face-side and a face-up version. Check which way the valve points on your cylinder before ordering a controller. ISTA makes its aluminium cylinders in face-up and face-side versions from 0.5 L to 3 L. Buy the cylinder last, once you know its valve orientation matches your controller.
Timer, check valve and safe handling
ISTA’s controllers carry a German-made solenoid with a safety valve, which turns the gas on and off. These points come from ISTA’s own instructions on the controller pages.
- Run the solenoid from a timer, or from a pH controller, so CO2 comes on before the lights and goes off before they do. ISTA’s reactor page adds that plants stop using CO2 in the dark, and overnight injection can crash pH.
- Always fit a check valve between the controller and the tank. Without one, tank water can siphon back into the controller when the gas shuts off.
- The dual gauge controller reduces cylinder pressure to approximately 1.5 bar.
- Never fit or remove a controller while the cylinder valve is open. Close the valve, bleed the gas until the gauge reads zero, then unscrew it.
- Hand-tighten only. ISTA says never to put a spanner on its controllers.
- Keep the cylinder upright and secured, out of direct sun, and below 50 degrees Celsius.
Step Four: Reactors for High-Demand Tanks
In heavily planted or CO2-hungry tanks, an inline reactor gives CO2 more time in contact with water than a simple diffuser can. The ISTA CO2 External Reactor and ISTA External CO2 Ceramic Reactor both plumb inline with a canister filter’s return line, dissolving CO2 before it ever reaches the tank rather than relying on diffusion inside the display. The ISTA Powered Surface Skimmer and CO2 Reactor does double duty, skimming the surface film that blocks light and gas exchange while also dissolving injected CO2, a useful combination unit for tanks fighting both problems at once.
Reactor or diffuser
A diffuser puts bubbles into the tank. A reactor sits on the filter return and dissolves the gas before the water reaches the tank, so very little visible mist escapes.
| Reactor | How it connects | Notes from the product page |
|---|---|---|
| CO2 External Reactor | Inline on the filter return, 12/16 mm (13 mm) hose, 4/6 mm CO2 tubing. It suits filters with 600 to 1,000 l/h of flow, and can also run inside the tank. | Patented impeller. Rinse the ceramic tube about twice a year. It will not fit 16/22 mm hose without a reducer at each end. |
| External CO2 Ceramic Reactor | Inline on the outlet of a canister or external filter, about 20 cm downstream of the filter outlet | Transparent chamber, so a turning impeller shows that water is flowing. The ceramic tube and impeller are both replaceable. |
A reactor restricts the return line, so check that your filter still turns the tank over properly after you fit it. Our filter sizing and turnover guide explains how to check that.
Step Five: Shaping the Scape
Once CO2 is dialed in, the aquascaping side of ISTA’s range covers the tools used to plant and maintain the layout. ISTA Pro Scissors, Curve End (available in dark or silver finishes) trim stem plants and carpet growth with a curved blade that reaches into tight spaces between hardscape. For attaching moss or small plants to rock and driftwood, ISTA Instant Glue (also sold in a 25-tube pack for larger projects) bonds underwater without leaving a visible residue, and the ISTA Coral Frag Plug 10-pack doubles as a mounting base for moss or small plant cuttings in freshwater scapes, not just coral frags.
Maintenance and Finishing Touches
Rounding out the range, the ISTA 3-Way Water Changer (12mm, or 16mm) and ISTA Extended Syphon Cleaner simplify substrate cleaning in a densely planted tank without disturbing root systems. ISTA Air Stones (50mm or 100mm) boost oxygen overnight when CO2 injection pauses, and ISTA USB Mini Cooling Fans help manage heat from bright planted-tank lighting. For breeding or isolating fish inside a display tank, the ISTA Breeding Box comes in large and medium sizes, and the ISTA Stylish Display Case With Light and ISTA Hydrometer round out the accessory side of the range.
Setting the CO2 level
Dennerle, a German maker of CO2 equipment, recommends 20 to 25 mg/l of CO2 for lush plant growth. The same instructions give a starting rule of about 10 bubbles per minute for every 100 litres of tank water, so about 20 a minute for a 200 litre tank. Dennerle adds that the right bubble count depends on several factors and must be worked out tank by tank (Dennerle CO2 test instructions).
Check it with a drop checker
A drop checker is a small glass indicator that sits in the tank. In Dennerle’s version, blue means too little CO2, green means about 20 mg/l, and yellow means too much. The colour lags behind the tank by some hours, because CO2 needs time to diffuse into the indicator. Dennerle therefore says to raise the CO2 in small steps spread over several days. It also advises refilling the indicator every 4 to 6 weeks. ISTA’s reactor page gives the same advice in other words: judge by a drop checker and not by bubble count alone.
Estimate it from pH and KH
You can estimate dissolved CO2 from your tank’s carbonate hardness and its pH. The formula is CO2 in mg/l = 3 x KH x 10(7 – pH), with KH in dKH. This is our calculation, not a manufacturer figure, and the table below was computed from it and rounded.
| Carbonate hardness | pH 6.6 | pH 6.8 | pH 7.0 |
|---|---|---|---|
| 3 dKH | 23 | 14 | 9 |
| 4 dKH | 30 | 19 | 12 |
| 6 dKH | 45 | 29 | 18 |
Values are estimated CO2 in mg/l. The 20 to 25 mg/l band that Dennerle recommends falls at about pH 6.6 at 3 dKH, pH 6.7 to 6.8 at 4 dKH and pH 6.9 at 6 dKH (our calculation).
The estimate only works if CO2 and carbonate are the only things setting your pH. Driftwood, humic acids, nitrate and pH-lowering products all push pH down without adding CO2, and Dennerle makes the same warning about using its tester as a pH monitor. Treat the number as a cross-check on the drop checker.
Quick Reference
| Stage | Product |
|---|---|
| Diffuse CO2 into the water | Glass CO2 Diffuser, 3-in-1 / 2-in-1 Diffuser, UFO Diffuser |
| Count bubbles / prevent backflow | 2-in-1 Bubble Counter + Check Valve (glass or metal) |
| Regulate cylinder pressure | Single Gauge / Twin Gauge CO2 Controller, Vertical Regulator |
| High-demand dissolving | CO2 External Reactor, External Ceramic Reactor |
| Surface film + CO2 in one | Powered Surface Skimmer and CO2 Reactor |
| Trim and plant the scape | Pro Scissors Curve End, Instant Glue, Coral Frag Plug |
| Substrate & water maintenance | 3-Way Water Changer, Extended Syphon Cleaner |
Building a System, Not a Shopping List
The easiest path through this range is to work in the same order CO2 actually flows: cylinder and regulator first, a controller to manage pressure, then a diffuser or reactor matched to your tank size, and a bubble counter somewhere in between so you can see and adjust the rate. The aquascaping tools and maintenance accessories are separate purchases that get added as your scape matures rather than upfront requirements. Because ISTA covers nearly every stage under one brand, mismatched fittings between components are rarely an issue: check your cylinder’s valve orientation (face-up vs. face-side) before choosing a controller, and the rest of the system should fit together cleanly.